Tuesday, December 27, 2011

DIY Subway Wall Art

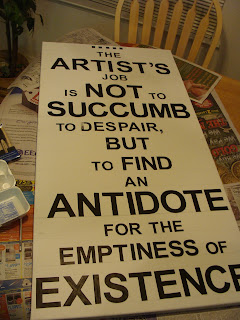
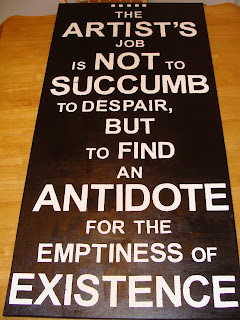
So it's 4:00 am and I just finished this project. Keep in mind I started around 7:30 pm, which means this is a long project. I even cut corners. The original tutorial I borrowed this idea from called for letting the letters stick overnight. I wasn't down for that, so I rushed. Sidenote: the quote I chose was said by Kathy Bates as Gertrude Stein in "Midnight in Paris." I watched that movie for the first time this weekend, fell in love with this quote and knew I'd finally found a piece of wisdom worthy of hanging on my wall. So here's the process; I hope you enjoy it.

Materials:
 1. Canvas (mine was 24x48 and cost me $19 at Michael's)
2. Paint Brushes (I already had these)
3. Acrylic paint, any color ($4 at JoAnn's)
4. Label paper (Avery full sheets, $10 at Office Max)
5. Exacto knife (I already had this)


Step 1: 
First you must choose what you want your art to say. I chose a quote. Then I designed my poster in Publisher by selecting the size of the document as the same as my canvas. Then I played around with the size and position of the letters as well as the font. Once I had the sizes I wanted I transferred the text to Word where I could print more letters on less paper (Publisher is weird that way). I made sure the sizes were the same and the font was right (Helvetica). Then I printed the letters on my letter paper.

Step 2:
Got letters? Cut 'em!


Then go ahead and arrange them on your canvas. Then measure the distance you want between the individual lines. Computer programs like Word and Publisher automatically set the space in between the lines for you, but when you're pasting them onto canvas you have to make sure they're equal. I neglected this until the middle when I realized they were going to be uneven, hence the weird dots at the top of the poster.


Step 3:
Next, cut out the individual letters. This is the part that took me the longest (2 and a half movies and  about 8 episodes of House Hunters, so about 5 hours). I didn't have help though so if you're lucky enough to get it, TAKE IT! Also because the letters were different sizes, I used two different types of scissors, a big pair and a small pair, as well as an Exacto knife for tiny spaces and helping to peel back the adhesive from the paper. Then attach the letters to the canvas. I used my original Publisher document (which was to scale) as a placement guide. Still though I had some crooked letters, and you can even see where I mis-measured and couldn't fit "to" on the same line as "succumb" so i had to fit it in front of "despair." That line being uncentered kind of bothers me, but whatever.


Step 4:
Get to painting! I used two coats of black acrylic paint. General wisdom says to wait for the layers to dry in between, but I'm an Impatient Pattie so I didn't. Also the label paper letters were starting to come up so I had to press them down again before I painted them. This scared the crap out of me because I was really worried about paint bleed. I've experienced paint bleed with canvas before, even when I was using painters tape, so I was pretty nervous.


Step 5:
 Peel off them letters. This part was quite satisfying, although also irksome as what I had just spent 5 hours creating took about 15 minutes to destroy. It was worth it though. Also, I peeled the letters when the paint was a bit wet still, but it didn't really matter. I used my Exacto knife to get underneath the letters and pull them up. There was minor paint bleed throughout the canvas, but I thought it looked better that way. 


And that's the final product. You can tell it's still a little wet, hence the shine and lack of matte finish. But I'll post some more pics eventually of the finished product hanging on my wall in Davis. Hopefully I can find a place to put it. I'm not sure how I feel about it overall though. I feel like it could have turned out a lot better considering the amount of work I put into it. The letters were a bit crooked and the 6th line is off-center, which bothers me. Still, it's not too bad for a first try. For your first try though I'd suggest a smaller undertaking. Hopefully yours turns out as great as you hope!

Sunday, December 25, 2011

A Classy Lamp

Classy Lamp Tutorial


 So I did this tutorial over summer before I moved into my new apartment in Davis because I needed a new lamp and didn't want to buy a new one at Target for $40.00. So I went right on down to the Salvation Army and picked up this baby for $4.00. Unfortunately it didn't dawn on me to record my steps for an online tutorial so I only have a before and after photo, but a damn good memory for an easy to follow summary.

 
It's kind of hard to see but the previous owner (a child, I hope) had attached little Snoopy stickers to the base of the lamp, hoping to jazz it up I suppose. So first, I peeled those off in addition to the price tag and cleaned the entire lamp with rubbing alcohol. You'd be surprised at the amount of grime that builds up. Then I used painter's tape to cover the cord and little knob that turns on the light. Next, I bought two cans of spray paint, one of which was a primer and the other was a flat black. Then I took the lamp out to the backyard and primed it. Do no more than 2 layers, as the paint build up will make it look weird. Once the primer dried (which didn't take long in Fresno's 100+ degree August heat), I did several coats of black. I allowed the paint to dry between layers. Once the lamp was completely dry I attached a new light bulb and lamp shade and voila! A modern lamp was born.


The tutorial that I borrowed this from attached really pretty fabric to the lamp shade to match the turquoise she'd painted the lamp. This is one of the easiest tutorials you can do and it's pretty cheap, except for the spray paint which was around $8.00 at JoAnn's. Turns out though that it's about half that price at Lowe's.  The lamp shade was purchased for me by my mother; technically free for me, but might set you back about $10-$15, depending on where you get it. Let me know how yours turn out!
Tile Coasters

This is my first tutorial that I'm posting and I'm really excited! I found a similar tutorial this past summer and have been dying to try it but didn't get the chance until now, over winter break. My apartment in Davis is (obviously) red, yellow, and blue themed and one of my roommates is a design major who's really into art. I thought the matching colors and the artsy feel of the paint chips would gel well. Plus, our apartment is kind of modern, so it all works.


Materials Needed:
1. 4x4 tiles (purchased at Lowe's for about $.16 each)
2. Paint chips (however many you need and in your desired colors)
3. Rubbing alcohol and cotton balls (optional)
4. Mod Podge
5.Paint brushes
6. Felt covers (for the bottom)
7. Ruler and something to cut with (I left my Exacto knife in Davis so I had to use a box cutter).

 Step 1:

Lay down a couple sheets of newspaper (or not, if you're brave- I wasn't) and arrange your tiles with enough space between them to do your thing. Then proceed to clean the tiles with the cotton balls and rubbing alcohol. This isn't required, but I did it just to work with a clean surface. Who knows what goes down at Lowe's.

Step 2:

Measure and cut your paint chips to size. I wanted to leave a 1/8th of an inch border around my chips so I measured accordingly. I also wanted the names of the colors to show, so I made sure to cut on the other side of the paint chip. Also, the top color (which is usually the lightest) was more pink than red, so I tried to eliminate that as much as possible.


Step 3:
Add a thin layer of this glorious solution ($6 at Wal Mart, maybe cheaper at Michael's with a coupon) to your tile and affix your measured paint chip to it. Work fast because it can be a bit hard to move the chips around with the mod podge once it starts to dry. 


 Then add a layer of Mod Podge to the top of your chip. Allow it to dry then add several more layers while allowing the Mod Podge to dry between each application. The Mod Podge will act as a sealant to keep out the condensation of any drinks you may put on it.


Repeat the process for the rest of your tiles, however many there may be. 


Step 4:
Attach felt pads to the bottom of the tile to prevent scratches on whatever surface you put it on. I haven't attached mine yet, thus no pictures, but you can get them at Target I'm sure. They're the ones you would put on the bottom of chairs. I don't imagine they'll cost too much.
Step 5: 
Take a few photos and enjoy!


A Few Comments:
If you look closely you can see lines left by the Mod Podge on the surface of the tiles. That may just be a result of the Mod Podge or the application process (I used foam brushes). If the lines really bother you, you can try altering the application device, but I actually like them. They give the whole thing a DIY/personalized look. Let me know how yours turn out! Also, you can use pretty much whatever you want on the top, e.g. seasonal scrapbook paper, classy wrapping paper, decals, etc. Just have fun with them! Once you purchase the mod podge (which was the most expensive part of this project) then you can make all kinds of different ones for cheap and switch them out year round or give as really neat gifts.

Tuesday, December 20, 2011

What are The Life Chats?

At this point you may be wondering what the hell the title of this blog means. The Life Chats refer to a series of chats that I have had/will have with several of my closest friends, much like Socrates and Theaetetus, Glaucon, etc.

Because I have friends who go to school all over California, e.g. Davis, Fresno, Los Angeles, Irvine, Sacramento, etc. we only get to see each other a handful of times throughout the school year, mainly during long weekends and holidays. And since we're all young adults who've managed to avoid death for about 21 years, we've got the rest of our lives ahead of us. Needless to say, that scares the hell out of us.

So my friends and I spend weeks at a time away at college, studying the nature of the universe (but not really) and second guessing the decisions we've made that will inevitably shape the course our lives. And once the anxiety of determining the rest of our lives at such a young age has built up, we return to Fresno where we most undoubtedly drink too much wine and engage in what we call "Life Chats." We discuss the decisions we've made in life and whether or not they were the right decisions. We ask each other for advice about love and relationships. We debate the existence of God. We confess some of our deepest secrets. We contemplate the pros and cons of marriage and children.

Life Chats have often been the catalyst through which my friends and I have discovered the most about ourselves. In naming my blog "The Life Chats" I hope to not only pay homage to the wonderful effect that both life chats and my friends have had on my life, but also to utilize the same form of introspection in my posts so that I might learn more about myself through this process.

And so it begins!

I can't help but feel wildly intimidated as I embark upon my very first blog ever. I suppose the intimidation stems from the fact that you, my currently non-existent audience, will soon be reading these posts and making judgments about who I am as a person and whether or not my hobbies, interests, and core beliefs are acceptable to you. Quite frankly, that scares the hell out of me, so please be gentle in your judgments. Let me start with a little information about myself, why I started this blog, and what I hope it will accomplish.

First, my name is Kelsy and I'm a senior at the University of California, Davis. And no, I was not one of the students who was pepper-sprayed; in fact, I was 300 miles away when that even occurred. I'm studying philosophy at UC Davis and plan to attend law school next fall (which is a whole other can of worms that I hope to discuss at length in a later post). I hail from Fresno, California, which is actually a pretty neat place to live once you've had the opportunity to experience life elsewhere. Despite having nearly 1,000,000 people in Fresno County, Fresno is actually a pretty small town and you're bound to run into someone you know at the grocery store, especially when you decide to be brave and make the trip sans makeup.

I started this blog for several reasons: 1) I love to write. Writing has always been a part of my life ever since I learned to type on a ridiculously huge word processor in my parent's dining room in 1995. My earliest story was about a witch who liked to eat children but was one day faced with a lack of children. "She grumbled madly," was the culmination of the witch's frustrations. The entire story was one paragraph and currently resides on the wall in my father's office. I like to think my writing has improved slightly since the tender age of 5. 2) I love to craft. I'm tired of seeing really neat tutorials on other people's blogs and wishing I had one of my own to share my cool creations. So here it is; get ready for some pretty rad crafts and DIY tutorials. 3) I should be working on personal statements for law school but I'm kinda lazy and suffer from chronic procrastination. Hence, blog.

As for what I hope this blog will accomplish: well, nothing really. I don't really think that blogs are teleological in nature, rather, I believe that it's all about the process of creating and shaping the blog. Instead of hoping to reach some end, I'd like to simply enjoy the writing process and share some of my thoughts about life as well as a few DIY/craft tutorials.