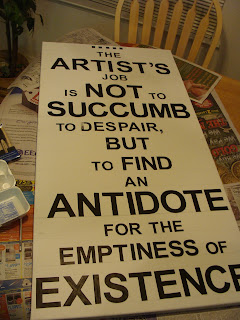
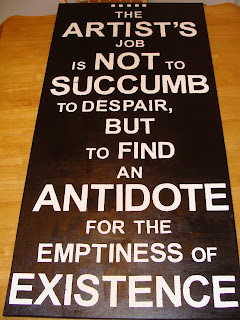
So it's 4:00 am and I just finished this project. Keep in mind I started around 7:30 pm, which means this is a long project. I even cut corners. The original tutorial I borrowed this idea from called for letting the letters stick overnight. I wasn't down for that, so I rushed. Sidenote: the quote I chose was said by Kathy Bates as Gertrude Stein in "Midnight in Paris." I watched that movie for the first time this weekend, fell in love with this quote and knew I'd finally found a piece of wisdom worthy of hanging on my wall. So here's the process; I hope you enjoy it.
Materials:
1. Canvas (mine was 24x48 and cost me $19 at Michael's)
2. Paint Brushes (I already had these)
3. Acrylic paint, any color ($4 at JoAnn's)
4. Label paper (Avery full sheets, $10 at Office Max)
5. Exacto knife (I already had this)
Step 1:
First you must choose what you want your art to say. I chose a quote. Then I designed my poster in Publisher by selecting the size of the document as the same as my canvas. Then I played around with the size and position of the letters as well as the font. Once I had the sizes I wanted I transferred the text to Word where I could print more letters on less paper (Publisher is weird that way). I made sure the sizes were the same and the font was right (Helvetica). Then I printed the letters on my letter paper.
Step 2:
Got letters? Cut 'em!
Then go ahead and arrange them on your canvas. Then measure the distance you want between the individual lines. Computer programs like Word and Publisher automatically set the space in between the lines for you, but when you're pasting them onto canvas you have to make sure they're equal. I neglected this until the middle when I realized they were going to be uneven, hence the weird dots at the top of the poster.
Step 3:
Next, cut out the individual letters. This is the part that took me the longest (2 and a half movies and about 8 episodes of House Hunters, so about 5 hours). I didn't have help though so if you're lucky enough to get it, TAKE IT! Also because the letters were different sizes, I used two different types of scissors, a big pair and a small pair, as well as an Exacto knife for tiny spaces and helping to peel back the adhesive from the paper. Then attach the letters to the canvas. I used my original Publisher document (which was to scale) as a placement guide. Still though I had some crooked letters, and you can even see where I mis-measured and couldn't fit "to" on the same line as "succumb" so i had to fit it in front of "despair." That line being uncentered kind of bothers me, but whatever.
Step 4:
Get to painting! I used two coats of black acrylic paint. General wisdom says to wait for the layers to dry in between, but I'm an Impatient Pattie so I didn't. Also the label paper letters were starting to come up so I had to press them down again before I painted them. This scared the crap out of me because I was really worried about paint bleed. I've experienced paint bleed with canvas before, even when I was using painters tape, so I was pretty nervous.
Step 5:
Peel off them letters. This part was quite satisfying, although also irksome as what I had just spent 5 hours creating took about 15 minutes to destroy. It was worth it though. Also, I peeled the letters when the paint was a bit wet still, but it didn't really matter. I used my Exacto knife to get underneath the letters and pull them up. There was minor paint bleed throughout the canvas, but I thought it looked better that way.
And that's the final product. You can tell it's still a little wet, hence the shine and lack of matte finish. But I'll post some more pics eventually of the finished product hanging on my wall in Davis. Hopefully I can find a place to put it. I'm not sure how I feel about it overall though. I feel like it could have turned out a lot better considering the amount of work I put into it. The letters were a bit crooked and the 6th line is off-center, which bothers me. Still, it's not too bad for a first try. For your first try though I'd suggest a smaller undertaking. Hopefully yours turns out as great as you hope!


No comments:
Post a Comment